Time: A few hours to several weeks, depending on who’s participating
What you need:
Other people
8 ½ x 11” transparency sheets (1 per person)
Fine point Sharpies (1 per person, or enough to share)
Sunprint paper (size variable)
Tub of water
Optional:
Access to a computer with Photoshop, a printer, and a scanner
Clear tape
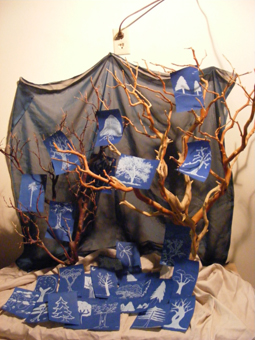
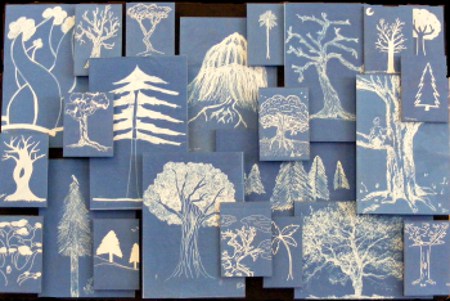
This is a great collaborative project! Whether you’re with a class, a birthday party, a family, or an office, everyone has something to add. The idea behind the “forest of trees” is to get as many people involved as possible. 29 people working at the Lawrence Hall of Science did this project, and the coolest thing about it was the huge range of ideas people came up with. Each person was asked to draw a picture of any kind of tree on a piece of transparency with a fine point sharpie (other markers are too transparent), and then we made prints of them with Sunprint paper. The more inventive and outlandish, the better!
Once you’ve collected your tree drawings, there are lots of options for the finished project. Our trees are on display in the Discovery Corner Store at the Lawrence Hall of Science, and so the amount of space we have to put them in and the overall look was a big factor in our process. To make the detail finer, as well as accommodate our space, we decided to scale many of them down to 1/4 their original size. We scanned the transparencies into a computer, putting a piece of white paper behind them so that the image would come out more clearly. Using Photoshop, we darkened parts of several of them, so that the contrast in the finished Sunprints was more dramatic. Shrinking them to fit four to a page, we printed them all out on new transparencies and cut them apart. Then we exposed each transparency on a ¼ sheet of Super Sunprint paper, and pressed and dried them.
Another idea is to overlap the drawings so that they make a tree-line image. For this, you’d want to use the Sunprint Master sheets, which are 24 by 36”. When we tried this, it looked better with the sheets cut in half to make two long skinny ones, just a bit taller than the 8 ½ by 11” transparencies, which leaves some wiggle room for layout. Once you find an arrangement you like, tape them together with small pieces of clear tape.

The first process we tried was to make Sunprints of the original tree drawings, without altering their size. This is probably the easiest way to create your forest, and we recommend this if you’re hosting a single day event with a large, highly diverse group of trees, since it can be hard to arrange them together. Also it’s much easier than messing with scanning and Photoshop!
If you don’t want to have a large group of trees that don’t go together, try having everyone draw the same kind of tree, or even making landscapes by ecosystem, like rainforests or deserts. Send us pictures of your Sunprint forests!